


The GameSynth Tool API offers an easy way to interface GameSynth with other creative tools. It comes with many scripts and add-ons, and more are being developed by the community. In this post, we will focus on the three scripts currently available for Unity, and explain how you can use them to improve your sound design workflow when making games!
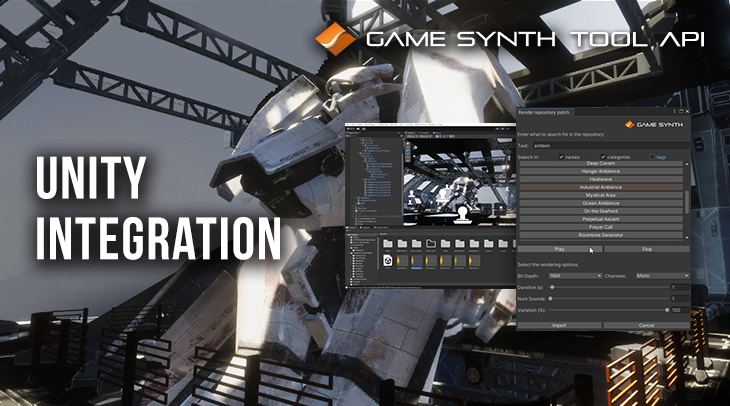
To illustrate our point, we will design all the sounds of the scene below, without even leaving Unity! We will see how to render the hangar ambience from a patch in the GameSynth repository, how to produce multiple sound variations for the mech’s armor, and how to generate a mechanical sound that perfectly matches the motion of its robotic arm.

Getting started
Before getting started, we need to import the GameSynthAPIExamples package into our project. The latest version of this package can be found on the examples page of the web site dedicated to the GameSynth Tool API.
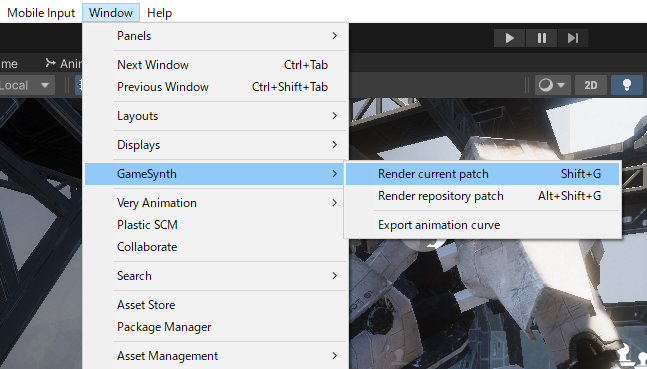
Once this is done, a few scripts will be copied in the Assets/Editor folder, and 3 commands will appear in a new GameSynth submenu of the Window menu.
If you are interested in the nuts and bolts and want to write your own scripts, we recommend that you check the code of these examples as well as our introduction to the GameSynth tool API.
Rendering sounds from the patch repository
We will start by adding an ambience sound to the hangar. To achieve this, we use the new Render Repository Patch command. As its name implies, it will render a procedural patch from the GameSynth repository into a wave file, and add it as an audio asset to your project.

In this case, we looked for all the patches that include “ambien” in their names or in their category name. Note that we could also have searched the tags associated with the patches. The list of patches matching our criteria is dynamically updated as we type in. Clicking on a name loads the corresponding patch in GameSynth, at which point we can listen to it directly from Unity by pressing the Play button.
The “Industrial Ambience” patch from the repository fits our scene perfectly. If a patch is infinite – which is often the case with ambiences – the duration slider is enabled, allowing you to select the duration of the sound to render. Here we decided to generate 20s of ambience. This is obviously one of the benefits of using procedural audio: new audio material can be produced as needed, without having to record or edit sounds.
After pressing on the Import button, the ambience is rendered as a WAVE file and added to your Assets folder. It has the same name than the patch in GameSynth. Note that the sound is generated at the sample rate selected in GameSynth. Go in the settings of GameSynth to change it if needed. Bit depth and number of channels can for their part be selected in the script’s UI.
Creating sound variations for your game
With the ambience taken care of, we now turn our focus on the mecha’s sounds, and more particularly to the sounds produced by its armor. In this case – as often in games – we want to generate several variations to avoid the audio to be too repetitive.

After creating or loading a patch that can be randomized, we render it. This time, we use the Render Current Patch script as the patch is already open in GameSynth. And this is where procedural audio shines again: in the UI of the script, we can simply select the number of sounds we want to generate, and set the amount of variation desired. All the sounds will be automatically rendered and added as assets to your game: all you need to do is to write a short script that randomly picks one each time the armor moves.
Note that the script we used previously to render patches from the repository also offered options for the generation of variations.
Controlling sound parameters from animations
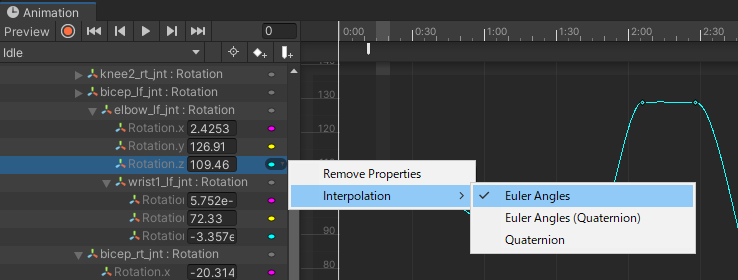
Finally, we get to create the sound for the movement of the mecha’s arm. Since the audio must follow the animation closely, we will export an animation curve and use it to drive the synthesis parameters in GameSynth.

In order to achieve this, after selecting the robot, we run the Export Animation Curve script. A list of all the animation curves associated with this object (with their full object/clip/bones path) is displayed. In this case, we select the rotation of the elbow around the Z axis.
Note: make sure that your curves are using Euler Angles interpolation – and not Quaternions – or they will look different once exported in GameSynth.
This script evaluates an animation curve at regular intervals so the UI lets you adjust the number of points you want to generate per second.
After pressing on Export, a new automation curve named after the animation curve will appear in GameSynth. It has the same shape and can be used to control one or several sound parameters, allowing us to generate a mechanical sound perfectly synchronized to the arm’s motion.
Then, you just need to call the Render Current Patch script to render the corresponding wave file in your Assets folder. Again, something that would have been cumbersome to create with fixed recordings can be done quickly with procedural audio. Even better, should the animation or its duration change, you only need to export the new curve and render the sound again!
These Unity scripts are only provided as examples of what it is possible to achieve with the GameSynth API. Feel free to build upon them and let us know if you develop useful workflows for game audio development with the GameSynth Tool API. We will be happy to share them on the API’s web page!

