


In the first part of this blog, we saw how easy it is to import animation curves in GameSynth, and to make them control one or several audio parameters, creating sound effects that truly match your animations.
Our first example was using the Particles model of GameSynth. In this post, we will focus on the Modular model, GameSynth’s patching environment. Among its 130+ modules are synthesis, control, and logic functions that can process your animation curves and create any sound you can imagine!
Triggering sounds from a curve
Logic modules can help you trigger events when your curve reaches specific values. This will prove especially useful when you need to precisely time sounds with your animation, such as during a walk cycle, a character interaction, or when an object hits something.
For instance, if we take the animation of a metal box falling on the ground, we can simply use the curve corresponding to the vertical position to trigger impacts when the box is bouncing.
- After importing the curve in GameSynth, we add the Automation Curve module to the patch and connect it to a Crossings
- The Crossings module activates its outputs when the input signal crosses specific values. Here, we set it to trigger every time the height drops to 0.01, which corresponds to the box hitting the floor.
Since the timing originates from the curve, the sound generated will be perfectly synchronized with the animation. Moreover, if random ranges have been assigned to some of the GameSynth parameters, a slightly different impact sound will be produced each time (within the limits you set). In a DAW, we would have to create several impact sounds (instead of a single patch), and we would have to manually insert each one of them on a timeline to match the animation.

Processing curves for motion sounds
For a character’s movement, it is often better to use the velocity of a curve rather than its raw data.
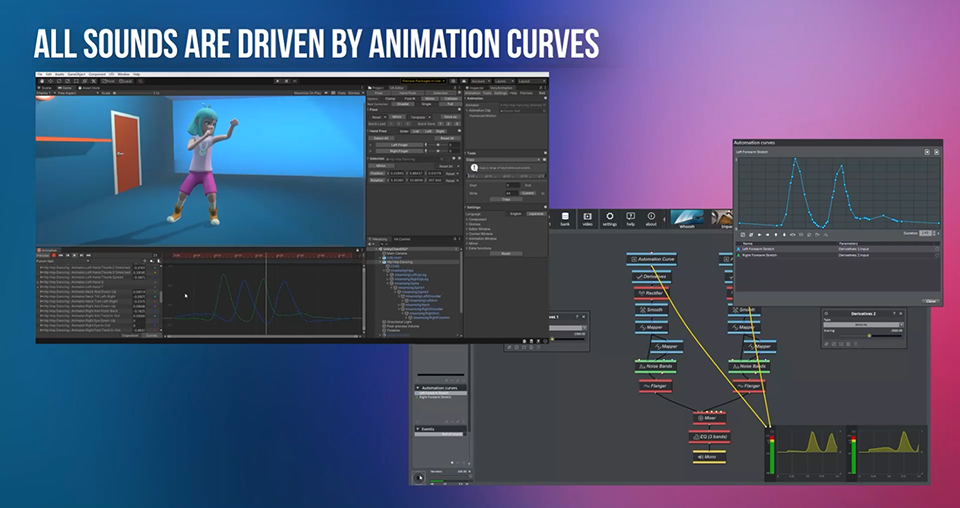
For instance, for the punching animation below, we use the position of the character’s forearms to generate a whoosh sound that will match the movement.
- This time, we imported two curves, one for each
- This means that our patch has two identical branches, with the same modules but slightly different parameters on the Noise Bands modules to differentiate the arms sonically.
- We use the Derivatives module to get the velocity of the Automation Curve, which will drive the amplitude and pitch of the Noise Bands
- The Rectifier is used to keep only the positive velocity, which is then passed through a Smooth module to add a bit of inertia.

Creating an animation usually requires a lot of iterations before getting the movement right, and the requirements can also change mid-project. Normally, this would mean that, as the timing of the movement or the entire duration changes, the previous sound design becomes obsolete.
However, since GameSynth uses the animation curves to drive the sound generation, all that is required is to update the curves in our patch for our sound to perfectly match the new animation. There is no need to record new sounds or to edit existing ones as you would in a standard sound editor.

Of course, the same techniques can be applied to 2D animation. The curves are often fewer and simpler, which makes them even easier to work with.
For this lance animation created in Sprite Studio, we use the velocity of the curves to design the motion sounds, as previously. However, we also use the raw data to synchronize the lance impact when the curve is at its peak.
- The velocity of the shoulder rotation curve is used to produce a whoosh
- We add a resonant layer only when the lance movement goes down (i.e., when the velocity of the rotation is negative).
- Then, a Crossings module triggers the impact sound when the raw value of the curve reaches its maximum.
- Finally, we use the velocity of the body Y position to add some Foley sounds when the character is jumping.
![]()
Using the GameSynth Tool API
As mentioned in the first part of this series, the GameSynth Tool API offers another way to convert animation curves into automation data (and a lot more!) One of the advantages is that you will not need to save and import intermediate files. Curves can be transferred in a single click from any creative tool that supports scripting. Anybody can create their own scripts for their favorite tools.
For example, Blender’s project and FBX files are binaries, which makes it difficult to create an importer for them. Now, thanks to the API, we can write a Python script to easily exchange animation data between Blender and GameSynth.
Our own Blender Add-ons include a script to export the selected F-Curve to GameSynth. Here is an example where we designed the sound of an abstract animation using four different curves.
- As for the character movements, we use the Derivatives module to extract the velocities from the rotation and the deformation angle curves, and use them to control the amplitudes of different branches in our patch.
- The raw curves of the deformation angles are also used to modulate other parameters such as pitch, feedback, and pan.
- Finally, the fourth curve – which corresponds to the deformation strength- drives its own branch to add a glitchy layer to the sound.

By using animation curves to drive the audio generation, we can easily design a sound that follows the movement of a complex abstract animation. Doing this in a standard audio editor would have been extremely tedious, requiring us to create each sound individually, and to synchronize them all to the motion.
These tips should cover most of the basics when it comes to using animation curves in GameSynth. Coupled with its unique synthesis capability, it is now easy to generate audio tracks for both realistic and abstract motions. Moreover, if you need inspiration, there are more than a thousand examples of patches in the GameSynth Repository that can be used and adapted to your curves.

